Saturday, December 28, 2013

Raw Dessert at its finest: Fruit Loaf Cake


I couldn't think of an apt title for this cake besides "Fruitcake" which makes it sound like those rock hard sugary dried fruit discs that are notorious around the holidays.  This version is raw, and inspired by a little cake photo I saw on pinterest yet couldn't find the link.

Any fruit for the center can be used; I used raspberries and clementines because we have so many, and I thought the vibrant orange would be pretty against the red of the berries.  Pretty maybe, but clementines are weird in a dessert, to be quite honest.  Next time I make this, blueberries, mango or kiwi will find their way into the center.

I do believe the sliced banana outside makes it easier to come out of the pan, but if you line the pan with wax paper and chill it well, the cookie crust alone should suffice.  This recipe is really easy to make, yet looks complicated.  All you need is a few hours' chill time and you're good to go!

Bonus: this tastes even better overnight.  So it makes a pretty rockin' breakfast after last nights' dessert.  Hey maybe lunch, too!

Raw Fruit Loaf Cake
yields 8 big slices

Ingredients:

Outer Shell:
20 small dates (or 15 larger medjool dates)
1-1/3 cup unsweetened shredded coconut
1/2 cup sunflower seeds
2 tablespoons sunflower seed butter, unsweetened
water, as needed

Fruit:
1-1/2 bananas
2 clementines
1 cup or so fresh raspberries
(feel free to sub in any of your fave fruits!)

Directions:

1.  In a glass loaf pan or plastic tupperware, (any shape of your desire really) line up slices of banana as shown:


2.  Food process the crust ingredients, adding enough water as needed for the mixture to come together and form a big ball of dough.  Press the cookie part around the bananas well, saving some of the dough for the topping (which will become the bottom when inverted).


3.  Layer the fruit of your choice, then pack down carefully the remainder of the dough to seal in the fruit and create a rectangle/box.  Chill for a few hours or overnight.


4.  Run a knife under hot water then slide it around the loaf, carefully.  It helps to use the knife to slightly pull the cafe away from the container's edge.  Invert and slice!


Saturday, December 21, 2013

Persimmon Biscotti


My mom went to Costco the other day and bought home a flat of pears and persimmons, and after eating a pear (one of my fave fruits if you haven't read about my pear frittatta yet), I eagerly set about baking with a couple of the overripe persimmons.  I jogged a bag over to her and her coworker at their office for a good workout and little surprise gift.

They were both very thankful for the treat, as it is still hovering at freezing in Eugene, with snow still on the ground.  These are warm and spiced persimmon biscotti that are just as good fresh as they are in a week or two (providing they last that long).  I actually made two variations; one with finely diced persimmon and the other with pureed, and though they were both good, this one was deemed the winner.

Persimmon Biscotti

Ingredients:


2 cups gluten-free or regular flour
1-1/2 teaspoon baking powder
1/2 c. coconut oil, melted
1/2 cup raw sugar
1 teaspoon lemon juice
1/8 teaspoon sea salt
2 large eggs
3/4 c. pistachios, shelled and chopped
1 persimmon, diced or pureed
optional: 1/2 nondairy chocolate chips


Directions:


1. Preheat oven to 350 degrees and grease or line baking sheets.
2. In a bowl sift together the flour and baking powder. In another bowl, combine the wet ingredients (except eggs) and cream together. Add in the eggs one at a time.
3. Add the flour mixture, not over-mixing. Stir in the persimmons and pistachios and chips if using.
4. Form the dough into a log on the baking sheet. Bake about 35 minutes and cool for 20 minutes.
5. Cut the log into 3/4-inch-thick slices and put back on the baking sheet. Bake until lightly golden, 15-20 minutes longer. Let cool on a wire rack.

Wednesday, December 18, 2013

Clean Eating Carrot Bread


I made this recipe last night when I was craving something sweet, and wanted something warm and filling to accompany my lentil soup and veggie dinner.  I came across this Carrot Spice Bread Recipe here, and played with the measurements and varied several of the ingredients to my liking.
The result is this gluten-free, dairy-free, refined sugar-free spiced and lightly sweet bread that will give your kitchen a warm and comforting aroma.  Enjoy the bread after it cools several minutes out of the oven; then slice and serve for breakfast, a snack or dessert.   If you invert the pan while the loaf is still hot, it may come out in sections.  I do believe it may be incredible as well served as french toast, or cut into a slab with cinnamon applesauce on top.


Clean Eating Carrot Bread
Ingredients:

1-1/2 cups grated carrots
1/2 cup unsweetened applesauce
3 tablespoons coconut oil
3 eggs, beaten
1 tablespoon chia seeds
2 tablespoons raw honey or maple syrup
2 tablespoons unsweetened vanilla coconut milk
1 teaspoon pure vanilla extract
1-1/2 teaspoon apple cider vinegar
1/2 cup gluten-free flour
1 teaspoon baking soda
1-1/2 teaspoons cinnamon
1/2 tsp ground ginger
1/4 tsp ground cloves
1/4 teaspoon allspice
1/2 cup gluten-free oats
Directions:
  1. Preheat oven to 350 degrees and grease a loaf pan with coconut oil or sunflower oil spray or line the bottom with parchment paper for easy removal.
  2. Mix all the dry ingredients together into a small bowl. In a separate medium bowl, whisk together the wet ingredients including carrots. Add the dry ingredients to the wet, and stir until incorporated.
  3. Pour batter into the greased loaf pan and bake for 45 to 55 minutes or until a toothpick inserted in the center comes out clean. 


4.  Let cool in the pan for a few minutes and then depan. Let loaf cool for 10 minutes longer then slice.

Sunday, December 15, 2013

Baked Pumpkin Donuts: A Perfect Winter Breakfast


I adored these, though my other taste testers pointed out they are a better breakfast than dessert, so I suppose you could add a little maple glaze to jazz them up.  I for one was ecstatic that grinding sunflower seeds into a flour actually worked, thereby increasing the nutritious value and adding a perfect compliment to the pumpkin and spice taste.  These are light moist little pumpkin treats that may convince you that you are enjoying decadent donuts.  Enjoy!

Note: don't over-bake these; these will seem slightly underdone, but when the toothpick comes out mostly clean, ket them cool in the pan to come to the perfect doneness (is that a word?)


Baked Pumpkin Donuts:
Gluten-free, Vegan, Nut-Free and Refined Sugar-Free
Yields 10 small "donuts"

Ingredients:

1/2 cup oat flour (or finely grind up gluten-free oats)
1/2 cup brown rice flour
1/4 cup coconut palm sugar
1/4 cup finely ground sunflower seeds
2 tsp cinnamon
1 tsp baking powder
1/2 tsp ginger
1/4 tsp allspice
1/4 tsp sea salt
1/8 tsp ground cloves
2 large eggs
1/4 cup + 3 tbsp coconut milk
1/3 cup pumpkin purée
3 tbsp unsweetened applesauce
2 tsp pure vanilla extract

Directions:
1. Preheat oven to 350 F and grease doughnut pan with a spritz of sunflower seed oil or dab of coconut oil.
2.  Combine dry ingredients in a bowl, mixing well. In another bowl, whisk the eggs, then add the coconut milk, pumpkin, applesauce, oil and vanilla. Whisk until well combined.
3.  Pour the wet mixture into the dry and stir with a spatula until barely combined, careful not to over mix.
4.  Scoop the batter into the doughnut pan filling each cup to just below the edge (about 1/4-inch from the top). Bake for 18 to 22 minutes until the donuts are lightly golden brown at the edges, or until an inserted toothpick comes out mostly clean. Let them cool in the pan for 5 minutes on a wire rack. Slide a thin spatula around the edges of the doughnuts to help de-pan them.  Enjoy warm!


Tuesday, December 10, 2013

Guest Post: Paleo in PDX


Today's post is found here on this awesome paleo blog, Paleo in PDX.  Fellow Oregon fitness and health enthusiast Alisa was kind enough to feature my Raw Mousse Cake with a Raisin Seed Crust Recipe.

It's an easy and rich dessert that will please everyone of all different diet restrictions.  Give it a try and let me know what you think!


Friday, December 6, 2013

Avocado Truffles

Dangerously good: these truffles are creamy rich and fatty.  But on the plus side, they are super filling and so creamy one is plenty, even for those with no willpower like me.  They are delicious chilled and even better slightly frozen when they are firm yet still creamy.  They are so easy to make, it is ridiculous, and they only time-consuming portion is waiting for them to chill.

I can't claim inventing this idea; it is loosely based on a bunch of avocado truffle recipes I found while perusing online, but this is the first I found with nondairy rice chocolate, and without additional sugar added.


Avocado Truffles
yields 15 to 20

Ingredients:

1 medium ripe avocado
1/2 cup nondairy rice chocolate chips, melted
1-1/2 teaspoons pure vanilla extract
1-1/2 tablespoons raw cacao powder

Directions:

1.  Puree the avocado in a food processor.
2.  Melt the chocolate chips, and stire slowly into the avocado, adding vanilla and cacao, continuing to mix well.

3.  Chill this batter in the fridge 1/2 hour to an hour; scoop into balls (optional: roll in additional
loose raw cacao powder)


Then chill further in fridge or freezer for 1-2 more hours.


Saturday, November 23, 2013

Pumpkin Avocado Bread


Yeah yeah, I know.  More pumpkin.  But this recipe is really good, and it is the season for pumpkin and spice.  So hold tight; I'm just about out of pumpkin and will move on to other treats soon.

This is similar to my first pumpkin bread posting, though I believe it is even a touch tastier.  My mother mused out loud how delicious it was, and was shocked when I told her it is based off her original recipe, one that is also quite good but also quite "bad" due to copious amounts of sugar and oil.

Pumpkin Avocado Bread
yields 1 loaf


Ingredients:

1/4 cup nondairy butter or nondairy yogurt
1/4 cup ripe pureed avocado
1/2 cup to 3/4 cup raw cane sugar or coconut palm sugar (i erred on the lighter scant 1/2 cup)
2 tablespoons chia seeds or ground flax meal mixed with 6 tablespoons water
2 teaspoons vanilla
1 heaping cup pureed pumpkin
2 teaspoons cinnamon
1/2 teaspoon ginger
1/4 teaspoon allspice
1/8 teaspoon nutmeg
1 teaspoon baking soda
1-3/4 cup gluten-free flour
dash sea salt

Directions:

1. Grease a loaf pan with coconut oil or nonstick spray.
2.  Mix nondairy butter, avocado and sugar until creamy.  Add in chia seed or flax meal mix once it is thickened and gel-like, continuing to mix well.  Add in heaping cup of pumpkin and vanilla.
3.  Add dry ingredients to wet, mixing just until combined.
4.  Fold batter into prepared pan and sprinkle cinnamon sugar on top and bake at 350 degrees for 50 minutes.
5.  Invert pan and let cool on a wire rack for at least 10 minutes before slicing into.

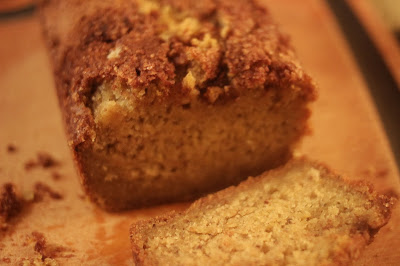
This version keeps its moisture well, and is a creamy delicious version of an old favorite but without dairy, eggs or gluten.
Store leftover bread in an airtight container; will keep several days.


Friday, November 22, 2013

...and Pumpkin Apple Muffins!


My "little" brother in the background reads the newspaper next to a pile of these breakfast muffins


I'll switch it up soon, I swear!  My fresh pumpkin supply is dwindling...
I wanted a lazy, easy breakfast muffin for my family, and since we all know I have an obscene amount of pureed pumpkin to use, I decided to create a muffin that I could pack in as much pumpkin as possible while still keeping it airy and not too moist.  I also had a soft golden apple to use up, so if you're like me and prefer less sugar in general, omit or reduce the sugar.

Another healthy option: substitute part of the pumpkin for unsweetened applesauce.  This will also sweeten the batter.  Pumpkin itself as well as the spices lend sweetness, so make this recipe to your taste!

Alternately, fold in some cacao nibs or nondairy chocolate chunks for a really yummy dessert option.


Pumpkin Apple Muffins
Yields 1-1/2 dozen medium muffins

2-1/4 cups pumpkin
1/2 cup nondairy milk
1 egg or egg substitution such as chia seeds or flax
1/4 cup nondairy butter or coconut oil, melted
3 cups gluten-free flour (suggested combination is 1 cup coconut flour, 1 cup almond flour or brown rice flour, 1/2 cup quinoa or sorghum flour and 1/4 cup tapioca flour)
1/2 to scant 3/4 cup raw cane sugar or coconut palm sugar
1 teaspoon cinnamon
1 tablespoon and 1 teaspoon baking powder
sprinkle of sea salt
1/2 teaspoon nutmeg
1/2 teaspoon allspice
1 ripe peeled and diced apple


Directions:

1.  Preheat oven to 400 degrees and grease muffin tins.
2.  Pour all wet (first 4 ingredients) into a large mixing bowl, and fold in dry ingredients just until combined.
3.  Fold in peeled and diced granny smith or golden apple.
4.  Spoon batter into muffin tins, filling up all the way.  Bake about 20-24 minutes or until an inserted toothpick comes out clean.


Wednesday, November 20, 2013

Healthy and Light Crustless Pumpkin Pie


I wasn't kidding when I said I had a ton of pumpkin to use up.  I also must admit I got the inspiration for this recipe from this blog, though I changed it more to my taste and found a version that is even healthier and suitable for those of us sensitive to gluten, flax and sweeteners such as stevia and xylitol.

This is a light, clean crustless pumpkin pie that you can have seconds, or even thirds of and not feel too guilty.  Bonus points if you cook down the pumpkin yourself.  (Note: my fresh pureed pumpkin is really light, so if you use canned pumpkin, you may find a darker hue).


Crustless Pumpkin Pie

Ingredients:

2 cups pureed or canned pumpkin
1 cup unsweetened vanilla coconut milk (or nondairy milk of choice)
1 tablespoon chia seeds
1 tablespoon pure vanilla extract
3/4 cup coconut flour*
2 teaspoons baking powder
dash sea salt
1 teaspoons cinnamon
1/4 teaspoon allspice
1/4 teaspoon ginger
1/8 teaspoon nutmeg
1/8 teaspoon cloves
1/4 cup coconut palm sugar or sucanat
2 tablespoons pure maple syrup

Directions:

1.  Grease a pie pan with coconut oil; set aside.
2.  Mix wet ingredients together; add chia seeds, mix well and set aside to thicken.
3.  Combine *coconut flour or any gluten-free flour, baking powder, salt, spices and sweetener of choice, adding dry ingredients to wet and mixing well.
4.  Pour mixture into pie pan and bake at 350 degrees for 35 to 45 minutes.
5.  Let cool covered in fridge for 7 hours or overnight to set fully.

Slice and serve!  Thanksgiving tip: whip up nondairy whipping cream (some health food stores have expensive but yummy rice whipping cream), and serve with a generous dollop of the cream and sprinkle additional cinnamon or cinnamon and sugar on top.

Pre-oven mixture:


Post-Baking:


Then, let cool down and chill overnight in the fridge!